mirror of
https://github.com/GoogleCloudPlatform/vertex-ai-samples.git
synced 2026-09-26 14:42:04 +00:00

30 KiB
30 KiB
In [ ]:
# Copyright 2021 Google LLC
#
# Licensed under the Apache License, Version 2.0 (the "License");
# you may not use this file except in compliance with the License.
# You may obtain a copy of the License at
#
#     https://www.apache.org/licenses/LICENSE-2.0
#
# Unless required by applicable law or agreed to in writing, software
# distributed under the License is distributed on an "AS IS" BASIS,
# WITHOUT WARRANTIES OR CONDITIONS OF ANY KIND, either express or implied.
# See the License for the specific language governing permissions and
# limitations under the License.
Vertex AI Pipelines: Lightweight Python function-based components, and component I/O
 Open in Colab |
 Open in Colab Enterprise |
 View on GitHub |
 Open in Vertex AI Workbench |
In [ ]:
! pip3 install --upgrade --quiet google-cloud-aiplatform \
                                 google-cloud-storage \
                                 kfp \
                                 "numpy<2" \
google-cloud-pipeline-componentsIn [ ]:
import sys

if "google.colab" in sys.modules:

    import IPython

    app = IPython.Application.instance()
app.kernel.do_shutdown(True)In [ ]:
import sys

if "google.colab" in sys.modules:

    from google.colab import auth

auth.authenticate_user()In [ ]:
PROJECT_ID = "[your-project-id]"  # @param {type:"string"}
LOCATION = "us-central1" # @param {type:"string"}In [ ]:
BUCKET_URI = f"gs://your-bucket-name-{PROJECT_ID}-unique" # @param {type:"string"}In [ ]:
! gcloud storage buckets create --location={LOCATION} --project={PROJECT_ID} {BUCKET_URI}In [ ]:
SERVICE_ACCOUNT = "[your-service-account]" # @param {type:"string"}In [ ]:
import sys

IS_COLAB = "google.colab" in sys.modules
if (
    SERVICE_ACCOUNT == ""
    or SERVICE_ACCOUNT is None
    or SERVICE_ACCOUNT == "[your-service-account]"
):
    # Get your service account from gcloud
    if not IS_COLAB:
        shell_output = !gcloud auth list 2>/dev/null
        SERVICE_ACCOUNT = shell_output[2].replace("*", "").strip()

    if IS_COLAB:
        shell_output = ! gcloud projects describe  $PROJECT_ID
        project_number = shell_output[-1].split(":")[1].strip().replace("'", "")
        SERVICE_ACCOUNT = f"{project_number}-compute@developer.gserviceaccount.com"

print("Service Account:", SERVICE_ACCOUNT)In [ ]:
! gcloud storage buckets add-iam-policy-binding $BUCKET_URI --member=serviceAccount:{SERVICE_ACCOUNT} --role=roles/storage.objectCreator

! gcloud storage buckets add-iam-policy-binding $BUCKET_URI --member=serviceAccount:{SERVICE_ACCOUNT} --role=roles/storage.objectViewerIn [ ]:
from typing import NamedTuple

import kfp
from google.cloud import aiplatform
from kfp import compiler, dsl
from kfp.dsl import (Artifact, Dataset, Input, InputPath, Model, Output,
OutputPath, component)In [ ]:
PIPELINE_ROOT = "{}/pipeline_root/shakespeare".format(BUCKET_URI)In [ ]:
aiplatform.init(project=PROJECT_ID, staging_bucket=BUCKET_URI)In [ ]:
@component(base_image="python:3.9")
def preprocess(
    # An input parameter of type string.
    message: str,
    # Use Output to get a metadata-rich handle to the output artifact
    # of type `Dataset`.
    output_dataset_one: Output[Dataset],
    # A locally accessible filepath for another output artifact of type
    # `Dataset`.
    output_dataset_two_path: OutputPath("Dataset"),
    # A locally accessible filepath for an output parameter of type string.
    output_parameter_path: OutputPath(str),
):
    """'Mock' preprocessing step.
    Writes out the passed in message to the output "Dataset"s and the output message.
    """
    output_dataset_one.metadata["hello"] = "there"
    # Use OutputArtifact.path to access a local file path for writing.
    # One can also use OutputArtifact.uri to access the actual URI file path.
    with open(output_dataset_one.path, "w") as f:
        f.write(message)

    # OutputPath is used to just pass the local file path of the output artifact
    # to the function.
    with open(output_dataset_two_path, "w") as f:
        f.write(message)

    with open(output_parameter_path, "w") as f:
f.write(message)In [ ]:
@component(
    base_image="python:3.9",  # Use a different base image.
)
def train(
    # An input parameter of type string.
    message: str,
    # Use InputPath to get a locally accessible path for the input artifact
    # of type `Dataset`.
    dataset_one_path: InputPath("Dataset"),
    # Use InputArtifact to get a metadata-rich handle to the input artifact
    # of type `Dataset`.
    dataset_two: Input[Dataset],
    # Output artifact of type Model.
    imported_dataset: Input[Dataset],
    model: Output[Model],
    # An input parameter of type int with a default value.
    num_steps: int = 3,
    # Use NamedTuple to return either artifacts or parameters.
    # When returning artifacts like this, return the contents of
    # the artifact. The assumption here is that this return value
    # fits in memory.
) -> NamedTuple(
    "Outputs",
    [
        ("output_message", str),  # Return parameter.
        ("generic_artifact", Artifact),  # Return generic Artifact.
    ],
):
    """'Mock' Training step.
    Combines the contents of dataset_one and dataset_two into the
    output Model.
    Constructs a new output_message consisting of message repeated num_steps times.
    """

    # Directly access the passed in GCS URI as a local file (uses GCSFuse).
    with open(dataset_one_path) as input_file:
        dataset_one_contents = input_file.read()

    # dataset_two is an Artifact handle. Use dataset_two.path to get a
    # local file path (uses GCSFuse).
    # Alternately, use dataset_two.uri to access the GCS URI directly.
    with open(dataset_two.path) as input_file:
        dataset_two_contents = input_file.read()

    with open(model.path, "w") as f:
        f.write("My Model")

    with open(imported_dataset.path) as f:
        data = f.read()
    print("Imported Dataset:", data)

    # Use model.get() to get a Model artifact, which has a .metadata dictionary
    # to store arbitrary metadata for the output artifact. This metadata is
    # recorded in Managed Metadata and can be queried later. It also shows up
    # in the Google Cloud console.
    model.metadata["accuracy"] = 0.9
    model.metadata["framework"] = "Tensorflow"
    model.metadata["time_to_train_in_seconds"] = 257

    artifact_contents = "{}\n{}".format(dataset_one_contents, dataset_two_contents)
    output_message = " ".join([message for _ in range(num_steps)])
return (output_message, artifact_contents)In [ ]:
@component(base_image="python:3.9")
def read_artifact_input(
    generic: Input[Artifact],
):
    with open(generic.path) as input_file:
        generic_contents = input_file.read()
print(f"generic contents: {generic_contents}")In [ ]:
@dsl.pipeline(
    # Default pipeline root. You can override it when submitting the pipeline.
    pipeline_root=PIPELINE_ROOT,
    # A name for the pipeline. Use to determine the pipeline Context.
    name="metadata-pipeline-v2",
)
def pipeline(message: str):
    importer = kfp.dsl.importer(
        artifact_uri="gs://ml-pipeline-playground/shakespeare1.txt",
        artifact_class=Dataset,
        reimport=False,
    )
    preprocess_task = preprocess(message=message)
    train_task = train(
        dataset_one_path=preprocess_task.outputs["output_dataset_one"],
        dataset_two=preprocess_task.outputs["output_dataset_two_path"],
        imported_dataset=importer.output,
        message=preprocess_task.outputs["output_parameter_path"],
        num_steps=5,
    )
    read_task = read_artifact_input(  # noqa: F841
        generic=train_task.outputs["generic_artifact"]
)In [ ]:
compiler.Compiler().compile(
    pipeline_func=pipeline, package_path="lightweight_pipeline.yaml"
)In [ ]:
DISPLAY_NAME = "shakespeare"

job = aiplatform.PipelineJob(
    display_name=DISPLAY_NAME,
    template_path="lightweight_pipeline.yaml",
    pipeline_root=PIPELINE_ROOT,
    parameter_values={"message": "Hello, World"},
    enable_caching=False,
)

job.run()
Click on the generated link to see your run in the Cloud Console.
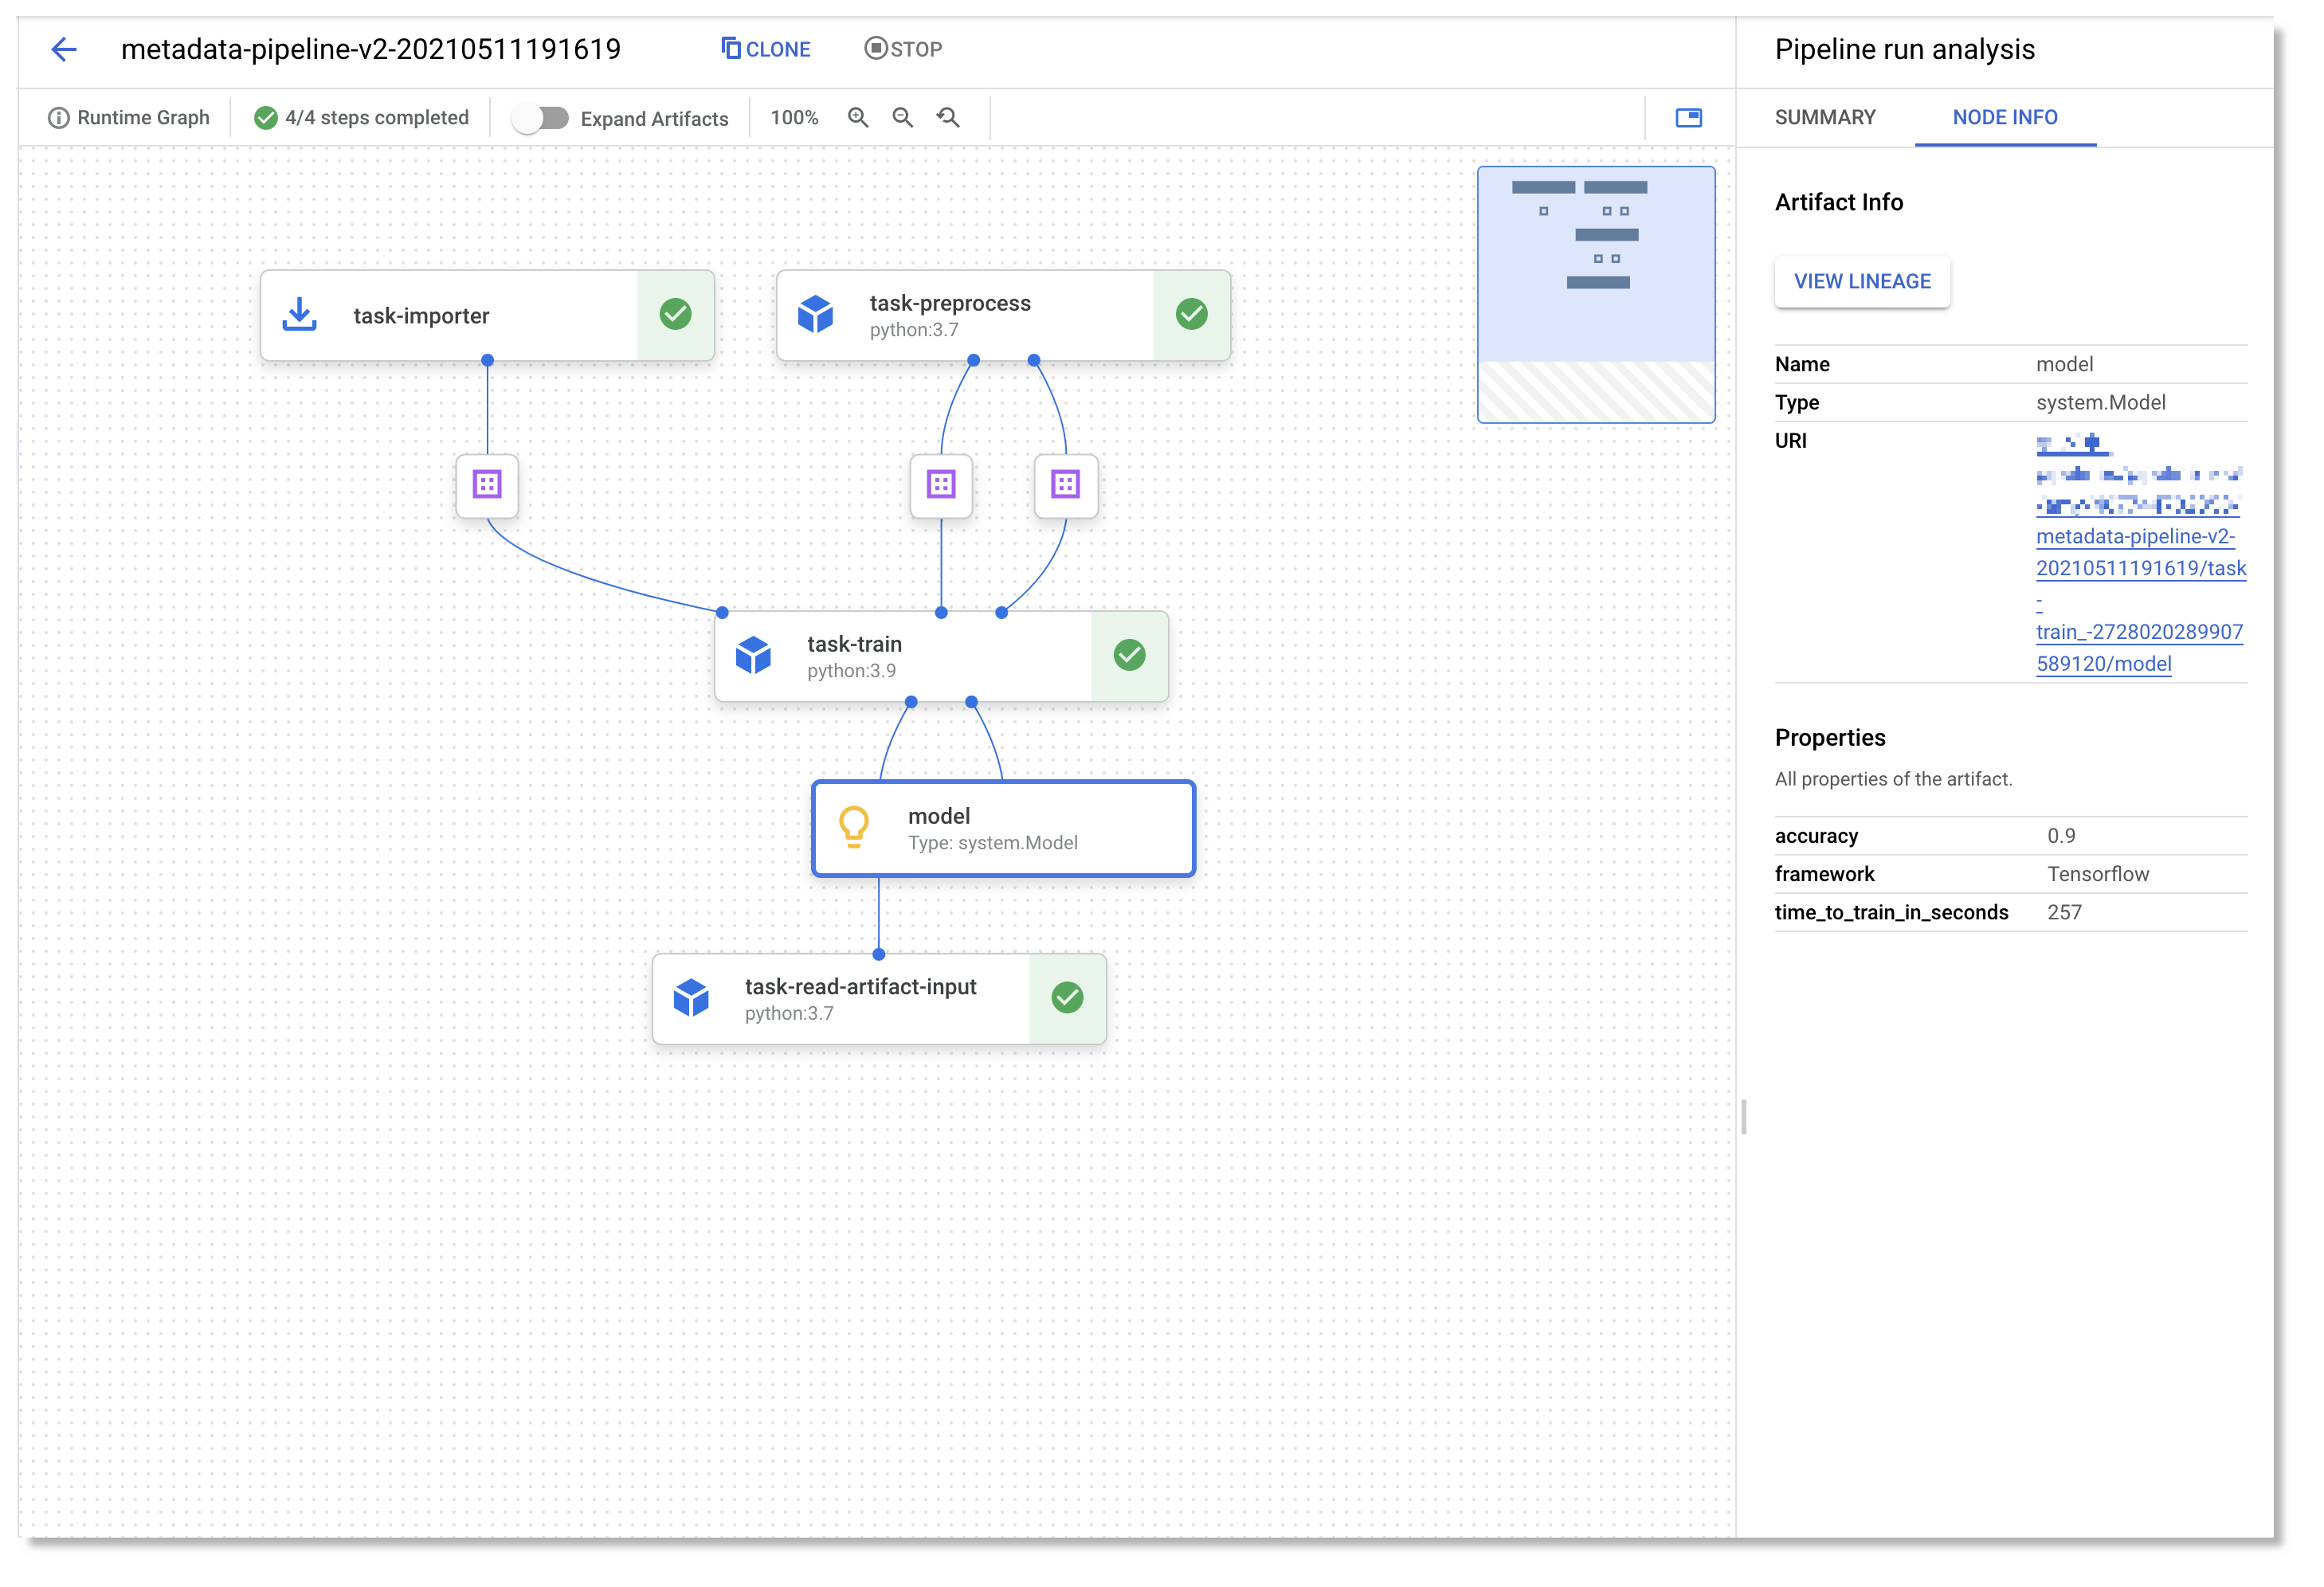
In the Google Cloud console, many of the pipeline DAG nodes expand or collapse when you click on them. Here is a partially-expanded view of the DAG (click image to see larger version).
In [ ]:
job.delete()In [ ]:
delete_bucket = False

if delete_bucket:
    ! gcloud storage rm --recursive $BUCKET_URI

! rm lightweight_pipeline.yaml